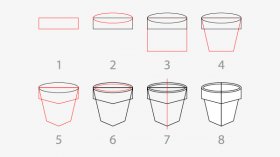
Step 2
The first figure we will draw is the pot.
- To work on this, first draw a Rectangle (M),
- Then add a circle aided by the Ellipse appliance (L),
- Today Copy the rectangle and Paste in Back (Cmnd + B),
- After that find the bottom nodes and hit "S" and scale all of them like in the image.
- Now choose the rectangles and increase anchor things in Object / Path / include Anchor Points and adjust them like into the picture.
- Find the group and Copy and Paste in-front (Cmnd + F) and scale it.
- Add a straight line and align it towards center of the cooking pot.
- Choose the line and visit Object / Path / Divide things Below now our pot is done!
Eventually hit "D" to place the fundamental white fill with a black colored swing.
3
Now you must to incorporate the stem for the plant.
- Initially we draw a Rounded Rectangle.
- Then we add a smaller Rounded Rectangle and rotate it like inside image.
- Pull it by pushing Alt + Shift to duplicate it one at some time then press Cmnd + D to replicate it once more during the exact same length (this demand repeats the final activity you do, in this case the duplication of an item).
- Group those three forms and duplicate all of them like within the picture.
 Finally our stem is completed.
Step Four
To create the leaf it's easy!
- Initially draw a square using Rectangle appliance (L)
- And rotate it.
- Adjust the nodes like in the picture.
- Today replicate the figure and scale it like inside picture.
- Eventually add a vertical stroke, select it thereby applying Object / route / Divide things Below.
Step 5
 The flower is pretty easy.
- First start with a square created with the Rectangle appliance (M)
- After that measure the anchor points like inside image.
- Finally, replicate the figure and adjust it like the image
Step 6
When it comes to various other part of the flower:
- Draw an octagon
- And a 8 point celebrity.
- Align them to focus making certain they fit together like in picture.
- Then replicate the octagon and adjust it like in the image.
- Select it and celebrity and hit Intersection in Pathfinder.
- Finally adjust the object like in design.
Step 7
Bringing most of the elements together, our letter should look something such as this. Now lets started with colors.
Step 9
Apply colour with your palette close to your example and with the Eyedropper Tool (I) you are able to choose a shade and by pressing ALT use it to decorate.
The rose would look something similar to this.
Step 10
Add more geometry and details like when you look at the picture below. This can be to give more life towards design.
Conclusion
I've done our design by very first finding All (Cmnd + A), after that Copy and Paste in Back and Ungroup every little thing. After that apply Unite in Pathfinder panel. Apply a purple stroke, this to add an underline towards drawing. Today our rose is done!
latest post
-
 Fine Art Textiles March 16, 2018
 -
 Fashion Print designers December 30, 2015
 -
 KSU Design June 8, 2016
 -
 Fabric Design Book December 21, 2017
 -
 Free Textile Designs November 16, 2017
 -
 Modern textile Designers July 4, 2017
 -
 Caitlin Wilson Designs May 5, 2018
 -
 Textile pattern Design software September 22, 2017
 -
 Sustainable textile Design July 19, 2018