
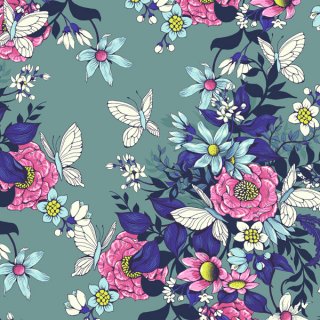
 What You'll Be generating
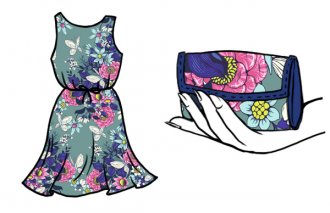
Occasionally you walk into a shop and also you think to yourself, "Aw man, all those clothes tend to be unsightly. If only I could sew my personal things, with my own flowery styles on it." And you absolutely can. I would ike to show you through means of designing yours floral style printing, which you yourself can later make use of for awesome and special DIY projects!
1. Earn Some Themes
Creating a structure to be used on material needs you to definitely give consideration to a few things prior to starting drawing.
Step One
First, consider carefully your scale. If your motifs are too large, they will look awkward on the last item, incase they truly are too small, the details are lost.
Strive for a scale that'll allow a great percentage of your repeat be seen. In the event that you intend to make big things like clothes, cushions, or home towels, it is possible to go with bigger themes. Should you want to make accessories like wallets or hairbands, the scale should be smaller or even the structure will never be noticeable.
The best wager should result in the design bigger than you imagine you will need, since it is easy to reduce picture dimensions in Adobe Photoshop, however it isn't possible to improve it without loss in high quality. But ensure that the degree of information therefore the depth of your lines tend to be appropriate your choice of scale.
Lines that seemed great while you were drawing all of them could look spidery and thin at a drastically smaller scale, or conversely they might appear dense and overpowering if pattern can be used at a sizable scale.
Step 2
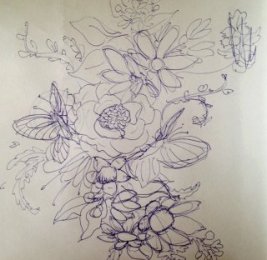
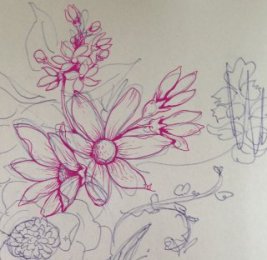
 Start sketching your themes. You need to use as many or as few different plants while you fancy, but my preference is obviously for a variety of blooms in various shapes and sizes, since this will later help you achieve an even more powerful repeat.
You'll sketch out specific flowers and leaves and place them collectively later on, however they won't ever fit together very including when you sketch all of them in a large bunch. The sketch can be extremely rough and free because we will only put it to use as helpful tips.
3
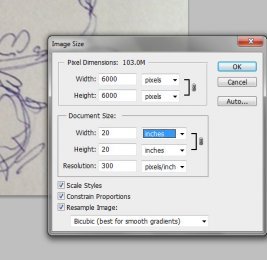
When you have sketched your blossoms in actual size you want to use within your final structure, scan your sketch at 300 dpi, since this is the image quality needed for a clear material print. Then you can certainly utilize that scan as your working document, therefore don't need to resize the picture after all before you start attracting the clean linework within the design.
In the event that you sketched your motifs smaller than you'd like them to stay in the final structure, feel free to stretch your scan to virtually any desired size by pressing Control-A > Control-T to get into the complimentary Transform appliance controls, and then Shift-dragging one of many corners outwards until your sketch has exploded sufficiently huge. This may harm the image quality of your scan, but you should not actually care, since the design is only going to be used to guide your linework.
Step
Now you can select the intense Round Brush Tool, or any other clean Photoshop brush of your choice, and start to-draw away clean lines over your design.
While you draw, your range width should differ, to create your lines more dynamic. You don't have to shut each shape neatly—you can allow the range path off or fade-out for an even more hand-drawn experience. In the event that you plan on using a darker color the outlines, you'll instantly draw shadows where petals meet or overlap, so the plants have more level.
 Step 5
Outline various motifs on different layers, so that you can effortlessly adjust them later, making additional copies and utilizing Edit > Transform > Flip, Rotate, or Scale to produce more variety within design without attracting brand new motifs.
Action 6
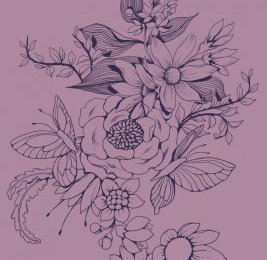
You really need to now have a clear range version of your initial sketch, that appears something like this.
2. Bring in Some Color
After the primary section of your overview is performed, you can start thinking about colors for the flowery structure. If you intend to possess textile display screen imprinted commercially, limit the number of colors you utilize to only feasible, since every extra color screen will increase the buying price of printing. In the event that you intend to have the textile printed digitally (e.g. at Spoonflower), you can use as much colors as the motivation desires.
Lay in the base colors. This can be done using the secret Wand appliance to choose the empty area within each motif, and choosing choose > change > increase and growing your entire choice by 1 or 2 pixels. This helps to ensure that there will be no gap betwixt your line and your color.
Go onto a unique level, and then click Alt-Delete to fill the choice together with your foreground shade, or Control-Delete to fill the selection along with your background color.
For motifs with countless range details that simply cannot be neatly selected, paint inside base shade with all the tricky Round Brush Tool. Be sure to hold all of the base colors on split levels, in case you like to make changes later on.
The answer to a cohesive color scheme lies in finding more than one part per color you employ. Challenge yourself to discover clever combinations that enable you to develop an abundant colorway while keeping the number of specific colors reduced.
My principle is start with 2 or 3 hot shades (red, yellow, purple, orange colors), 2 or 3 cool tones (blues, vegetables and violets), and some neutrals (white, grey, beige, tan, brown). The lightest tone may be used along with others to create shows.
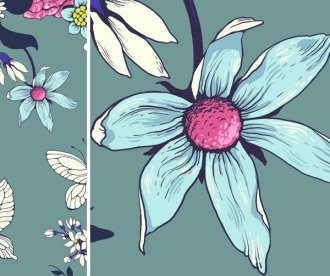
Darker shades could be layered above less heavy people to produce shadows, like light blue and gray blue in example listed below.
a lighter tone may be used above a deeper tone to give texture and detail, like the candy stripe structure regarding petals regarding the green rose here.
Action 5
Once you've accomplished a stylish color palette, you can use the colour of linework to add even more shadows in the middle of your motifs and layer some extra leaves when you look at the straight back.
latest post
-
 Fine Art Textiles March 16, 2018
 -
 Fashion Print designers December 30, 2015
 -
 KSU Design June 8, 2016
 -
 Fabric Design Book December 21, 2017
 -
 Free Textile Designs November 16, 2017
 -
 Modern textile Designers July 4, 2017
 -
 Caitlin Wilson Designs May 5, 2018
 -
 Textile pattern Design software September 22, 2017
 -
 Sustainable textile Design July 19, 2018