 A quick furniture task can change society when it comes to an old furniture piece or refreshing a dull interior area. Also, it may be very inspiring and gratifying to work on unique pieces, bringing them to life as they tell their story.
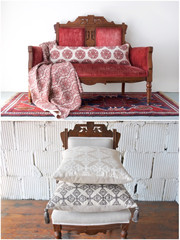
The perks of living in a tiny town are the small enterprises and getting to know the proprietors just a little better than might in a larger town. One of the best locations it go to is 'Not Bob's Antiques' on Lower Street, down town Spruce Pine. It has become a consistent haunt of mine for interesting finds to use in image shoots as well as re-upholstery tasks.
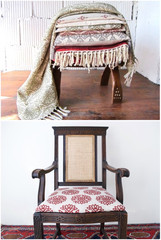
Herman, the type and peaceful store owner (Not Bob!) is unfazed by me scouring every nook and cranny of the store in search of one thing abnormally unique or simple to re-upholster. I have unearthed a few great treasures at Not Bob's which range from a 100+ yr old wood, caned cooked chair to a great purple velvet Eastlake Settee put, a camel seat (my favorite!) & most recently, a sweet, however just created Mid-Century Modern vanity chair. A most perfect wintertime task!Choosing The part: This model of chair is elegant and understated with clean outlines and classic detail. An ideal frame to counterbalance my Khema pattern in metal gray.
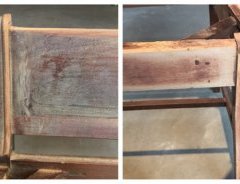
First: to begin with, wipe straight down any dust and grime which has had built up. This will offer you course on how far you are going to need to take reconditioning the lumber. Unfortunatly, there was paint sprayed onto the seat right back so I must sand it. (Please make use of a mask when sanding!)
 The Finish: I would generally keep the wood alone and simply wipe it down with a restore-finish like stain that preserves the original finish. (can be bought at your local hardware store, Lowes or Residence Depot) NOTE: It is not super eco friendly therefore please be mindful! It really is fast and simple but kindly match up with mask, rubber gloves, goggles, apron and a well ventilated space! Having said that, it can assist polish up, fill-in and enhance the beauty of the old finish as well as its color. It saves hard work while restoring the original look of the piece because was meant.
Look out for what a bit reveals in this procedure. They are details that should shine!
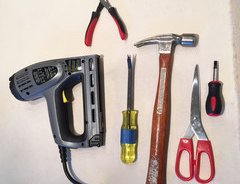
Upholstery Tools: i enjoy ensure that it stays easy. a basic firearm (and basics), pliers, small tack hammer, a-flat mind screw motorist, scissors, (fabric and non textile!) and my personal favorite upholsters device: a tack/staple remover….the screw driver-mini crow bar combo! This can be small guy will probably be your best friend for spying out old staples, tacks and nails… or new people that have been misplaced or misaligned. It saves some time your hands!
Fabric - The preferred One: in this situation, the seat had been chosen the fabric. but the textile nevertheless needed to be ironed, prepped and cut in to the right shape to match the chair. I frequently utilize chalk (on back of fabric) to softly mark completely where you can cut, but with this one, it had been pretty hassle free.
Whenever reducing material, remember to add extra to any or all sides. I add about 3 inches to be safe. This will allow some wiggle space for placement and enough to grab onto whenever pulling the textile taught to staple.
Another note: when working with a structure, particularly one with a tough path like Khema here, kindly pay attention to how it will lay out. Can it be vertical? Horizontal? (in this instance, both) or perhaps is it regarding the diagonal? They are important suggestions to have before scissors touch the textile. Be sure it will maintain its symmetry once put onto the seat. (Or seat straight back, or whichever component you may be focusing on).
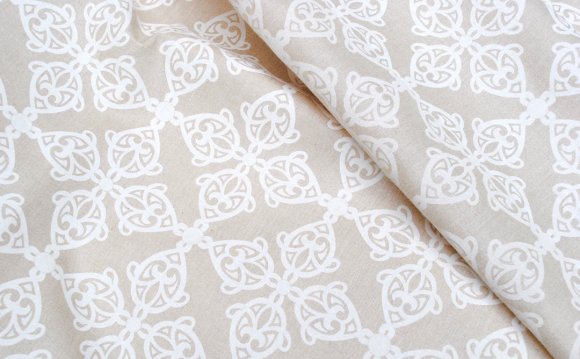
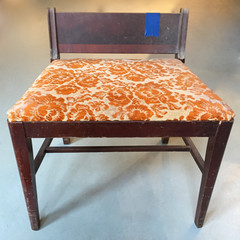 If Fabrics Could chat: Uncovering associated with wood construction associated with the piece isn't truly the only spend the an account to tell. Among my favorite moments is deconstructing the many levels of old textiles that put beneath the area. They also tell such stories of not merely the past proprietors decor tastes, nevertheless the decades the piece passed through. This went through a number of. I am going to imagine late 40's/early 50's (pale pinkish beige), 60's (green and white) and 70's (the tangerine).
Getting Right Down To (Brass) Tacks. Actually. - After pulling out each basic, tack and nail to get rid of the old fabric, always clean/sand down any splinters the tack remover could have taken up. I will be exactly about taking (very nearly) just as much proper care of the components that you don't see, since the people you are doing. As for the seat support, I decided on never to replace every thing, but did get rid of the top two levels of textile (the 70's lime and 60's green and white) so their particular colour and designs won't show-through the newest fabric.
Allow Games start: Upholstery is generally like painting a residence. 80per cent prep, 20% getting down to company. It is also about learning from your errors. (Note first picture ended up being taken BEFORE I removed the first two layers of textile!) But the image nonetheless illustrates the purpose.Fold about 2-3 ins of fabric over the very first side, basic 2 or 3 times into the center maintain it positioned. Pull the textile securely into the reverse side and basic another two or three times within the center. Still gently pull fabric while including 2 or 3 staples at a time, alternating edges while you get. This keeps the stretching regarding the fabric even.
Basics ought to be about an inch/inch and a half apart. Offer a fast assessment of both sides AND every thing underneath and in between. When the first couple of edges tend to be completed, ensure that the textile is laying level, tight, even along with no spaces over the sides. Make sure to make sure design positioning is straight besides!
Next! - Perform equivalent; basic the centers first on each side (opposite each other), after that work back and forth between sides until you have actually stapled all the way across and near to the sides.
Switching The Corner: a neat and tidy corner is crucial. Not merely for performing good work, but in addition maintain the material volume from interfering with the chair establishing to the seat kind properly. After you have stapled all edges, pinch fabric such that it tends to make a neat triangle, but hold it underneath component flush to the seat so you can get those final basics to the corners. (Note: You may have to fool around with the fold associated with sides a little, but attempt to buy them as clean and nicely collapsed down flat into a triangle possible.) Then staple to put on part folds into place.
latest post
-
 Fabric Surface Design January 17, 2016
 -
 Irish Interior Design March 8, 2016
 -
 Textile Design Careers February 4, 2018
 -
 CAD for Textile Design March 21, 2017
 -
 William Morris textile designs February 26, 2019
 -
 Free Textile Designs November 16, 2017
 -
 Textiles Design briefs December 12, 2018
 -
 Top fabric designers November 2, 2018
 -
 Textile Printing company February 3, 2016