 When I first started stitching, my mom gifted me a sewing basket packed with materials. Of all the supplies, the one that intrigued me the most was the tracing wheel. Just what worldwide had been we designed to do with that thing?
Once we identified that i really could make use of the tracing wheel to transfer habits to textile, the tracing wheel and I became close friends. Don’t be jealous, seam ripper! Using tracing wheel by my part, my sewing became a lot easier, not to mention more precise. Here’s the way I make use of that reliable tracing wheel to move habits and markings to textile.
Exactly what you’ll need:
- Cutting pad
- Blunt tracing wheel
- Dressmaker’s carbon paper (available at any craft supply store)
- Textile
- Pattern pieces
Instructions
1. Put your material regarding the cutting pad to stop scratches regarding work surface when you get moving.
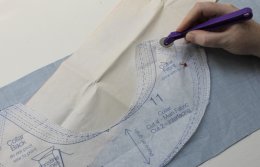
 2. Align the structure piece on your fabric as always, being sure to align the grainline. Contain the pattern piece positioned with design weights or pins placed inside pattern piece, various inches away from the size you will be tracing.
3. Choose a carbon paper shade that contrasts your fabric, so you can look at outlines you trace. If you’re unsure which one to utilize, simply test several various colors on a fabric swatch. Slip the carbon report, color part down, under the structure piece.
4. Roll your tracing wheel along the design piece, rolling it across the range for your size. If you’re dealing with a larger pattern piece, you’ll need to maneuver the carbon report round the edges, working one part at any given time.
5. Trace the structure markings, like notches and darts. You may need to go the pins around somewhat to make it to any markings that go in to the center for the structure piece.
6. Eliminate your pins or design weights. You ought to have a fantastic overview of the design piece right on the textile. I’ve shown you on a white interfacing above therefore the lines are easier to see.
Note: If you can’t see the marks demonstrably, you are able to use chalk or an environment erase fabric marker to strengthen the outlines for cutting.
To transfer markings
Pattern markings like dots and darts could be an actual pain to transfer. The tracing wheel helps make the process much simpler and means that all the scars enter the proper spot. For notches, i recently use the tracing wheel to mark a line about 1/4″ very long from structure piece advantage into the seam allowance.
For transferring darts, try using a double-faced tracing paper. This saves time since you just result in the level once, plus it ensures the dart could be the same on both sides! I also love to use a ruler, as pictured above, to mark darts. Some tracing wheels may be wobbly, and a ruler ensures you’re making a clear line within the correct spot.
latest post
-
 Fine Art Textiles March 16, 2018
 -
 Fashion Print designers December 30, 2015
 -
 KSU Design June 8, 2016
 -
 Fabric Design Book December 21, 2017
 -
 Free Textile Designs November 16, 2017
 -
 Modern textile Designers July 4, 2017
 -
 Caitlin Wilson Designs May 5, 2018
 -
 Textile pattern Design software September 22, 2017
 -
 Sustainable textile Design July 19, 2018