
 Your environment has a big impact on your feeling and performance, and adding character to a space is effortless (and cheap) with DIY crafts. Below, we’ll demonstrate a solvent image-transfer project that may be applied to numerous materials, eg timber and fabric.
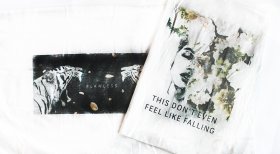
The solvent image-transfer process requires “borrowing” material from an imprinted product, chemically dissolving it, and moving the picture onto a unique surface. We’ll be using the picture transfer to fabric tote bags and wood cutting boards, but you can go one step further and try it on different items of your choice with the exact same mediums/materials.
First, think about what imagery or laughter you need to make use of. The number of choices are unlimited; just think slightly not in the field. You can easily decide to print everything from quotes to illustrations, and sometimes even your own personal design. (Just remember to mirror/reverse every little thing in your image before you print!) I love Beyoncé, so I used some verses from her songs as inspiration for the examples here. After obtaining imagery, I began to produce some styles.
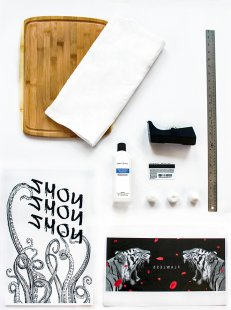 what you would require:
100percent acetone (nail-polish cleaner)
Cotton
A charge card or any other credit card
Wood/cotton textile
Tape
Ruler
A mirrored printing
Step One
Print out a mirrored/reverse type of your image in the desired dimensions. It can help when your image is darker and much more concentrated, and so the ink transfers much more effectively. You must use a laser printer, which will be essential because of the toner-based ink. Inkjet printer ink may bleed excessively.
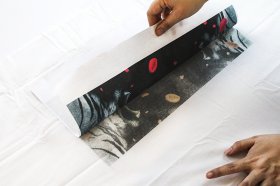
 whenever you’re prepared start the transfer, make sure you work in a well-ventilated location. Lay your printing image-side down on the material or timber area you’ve plumped for. Tape a side down, if needed, maintain it set up, therefore it doesn’t move through the procedure. Utilize a cotton ball or brush and saturate the rear for the print with acetone.
Step Two
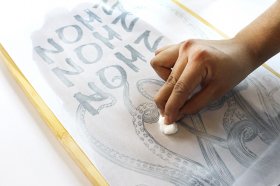
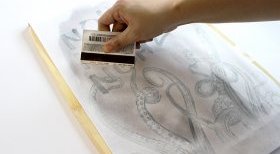
Using the card, wipe forward and backward throughout the backside of the printing. Use even stress, and stay cautious — an excessive amount of pressure may tear your printing. The ink transfers better once the location you’re burnishing is over loaded with acetone, so you could have to re-saturate in the event that acetone begins to dry up. Ensuring it is over loaded while straight away burnishing the print is essential, as it can establish a crisper transfer of the printing. If you wish to operate in smaller areas, it would likely also help if printing is big. Take to practicing on some report, scrap fabric, or lumber to obtain the hang from it very first.
3
Very carefully peel back a little to be sure of the transfer, and to see if you want to burnish much more. If it is to your pleasure, peel away the complete printed report to show your transferred picture.
Step 4
If you’re moving onto textile, throw the fabric because of the transferred image to the dryer for 10-15 mins once it’s done. The heat enables the ink settle into the material.
If you’re moving onto lumber, secure it with an obvious layer squirt. (ensure that the squirt you use is safe for areas you want to utilize all of them for anything edible.)


latest post
-
 Fine Art Textiles March 16, 2018
 -
 Fashion Print designers December 30, 2015
 -
 KSU Design June 8, 2016
 -
 Fabric Design Book December 21, 2017
 -
 Free Textile Designs November 16, 2017
 -
 Modern textile Designers July 4, 2017
 -
 Caitlin Wilson Designs May 5, 2018
 -
 Textile pattern Design software September 22, 2017
 -
 Sustainable textile Design July 19, 2018